Ensembles
An ensemble is a template for a deployment in NuNet. In NuNet, compute workloads are organized as compute ensembles.
A compute ensemble is a collection of logical nodes and allocations that work together to perform a distributed workload.
- Nodes represent the physical or virtual hardware where compute workloads run.
- Allocations represent individual compute jobs assigned to nodes.
Each node can host multiple allocations.
Understanding Nodes and Allocations
Allocations
Allocations are simply what you want to deploy. They represent the individual compute workloads, tasks, or services that you want to run on the NuNet network. Each allocation defines a specific job that needs to be executed, such as running a Docker container, processing data, hosting a web service, or performing a computational task. When you create an allocation, you specify what needs to run (like a Docker image), how much resources it needs (CPU, RAM, disk, GPU), and how it should be executed. Think of an allocation as a single unit of work that you want the network to perform—it's the "what" in your deployment configuration. You can have multiple allocations in a single ensemble, each performing different tasks or working together as part of a larger distributed application.
Nodes
Nodes represent the compute resources where your allocations actually run. A node is essentially a logical representation of physical or virtual hardware—such as a NuNet Appliance, a physical machine, or a virtual compute instance—that has the capacity to execute workloads. Nodes provide the computational infrastructure that allocations need to function, including CPU cores, memory, storage, and potentially GPU resources. When you define a node in an ensemble, you're specifying where your allocations should be deployed and executed. A single node can host multiple allocations, allowing you to efficiently utilize available resources by running several workloads on the same compute instance. In distributed deployments, you can define multiple nodes and assign different allocations to each one, enabling parallel execution and workload distribution across the NuNet network. Think of a node as the "where" in your deployment—the physical or virtual location where your workloads will actually execute.
A Simple Ensemble Configuration
This example shows a minimal ensemble configuration file that runs a simple Docker container (hello-world) on a single node.
It helps demonstrate how NuNet structures and executes workloads across distributed compute environments.
In NuNet, an ensemble defines how compute workloads (called allocations) are distributed across one or more nodes.
Each allocation represents a specific compute task or service, and each node represents a compute resource, such as a physical machine or virtual appliance — that runs those allocations.
Below is a simple YAML configuration example for an ensemble:
version: "V1"

allocations:
  alloc1:
    executor: docker
    type: task
    resources:
      cpu:
        cores: 1
      gpus: []
      ram:
        size: 1 # in GiB
      disk:
        size: 1 # in GiB
    execution:
      type: docker
      image: hello-world

nodes:
  node1:
    allocations:
      - alloc1
Understanding the Configuration
Version
version: "V1"
The version field specifies the format version of the ensemble file. This ensures compatibility with future NuNet updates.
Allocations
allocations:
  alloc1:
    executor: docker
    type: task
    ...
The allocations section defines the actual workloads that will run. Here, there is one allocation named alloc1.
executor: Defines the runtime environment — in this case, Docker.
type: Specifies the kind of workload.
task means this allocation runs once and then exits (unlike a long-running service).
resources: Declares the hardware requirements for this task, including CPU, RAM, disk, and optional GPU usage.
Resources
resources:
  cpu:
    cores: 1
  gpus: []
  ram:
    size: 1 # in GiB
  disk:
    size: 1 # in GiB
This allocation requests:
- 1 CPU core
- 1 GiB of RAM
- 1 GiB of disk space
- No GPUs
NuNet’s orchestration layer uses this information to find a suitable node that can meet these resource requirements before deploying.
Execution Details
execution:
  type: docker
  image: hello-world
This tells the system how to run the workload. Here:
The execution type is docker, meaning the workload runs inside a Docker container.
The image is hello-world, a lightweight Docker image that simply prints a message and exits — perfect for testing deployment.
Nodes
nodes:
  node1:
    allocations:
      - alloc1
The nodes section defines where each allocation runs. In this example:
There is one node, node1.
The alloc1 allocation runs on this node.
In larger deployments, you can define multiple nodes and assign different allocations to each one, enabling distributed and parallel execution.
This example represents the simplest possible ensemble — a single allocation running on a single node. It demonstrates how NuNet uses declarative configuration to define:
- What to run (allocations)
- Where to run it (nodes)
- How to run it (executor and resources)
From here, you can expand your ensemble by:
- Adding more allocations
- Connecting allocations together
- Defining multiple nodes
- Specifying more complex orchestration rules and constraints
You can scale from a simple test container to a distributed multi-node application running seamlessly across the NuNet decentralized compute network.
Uploading Ensembles
You can upload your own ensemble files for deployment. This allows you to create custom deployment configurations tailored to your specific needs.
Preparing Your Ensemble Files
Before uploading, you'll need to create your ensemble files:
- YAML File (Required): This is your main ensemble configuration file that defines allocations, nodes, and resources.
- JSON File (Optional): A corresponding JSON file that can be used alongside your YAML file.
You can create these files using any text editor, such as Visual Studio Code. Create a new folder for your ensemble files, then add:
- Your ensemble YAML file (e.g.,
my-ensemble.yaml) - Your corresponding JSON file (e.g.,
my-ensemble.json) - if needed
Save both files in your chosen folder.
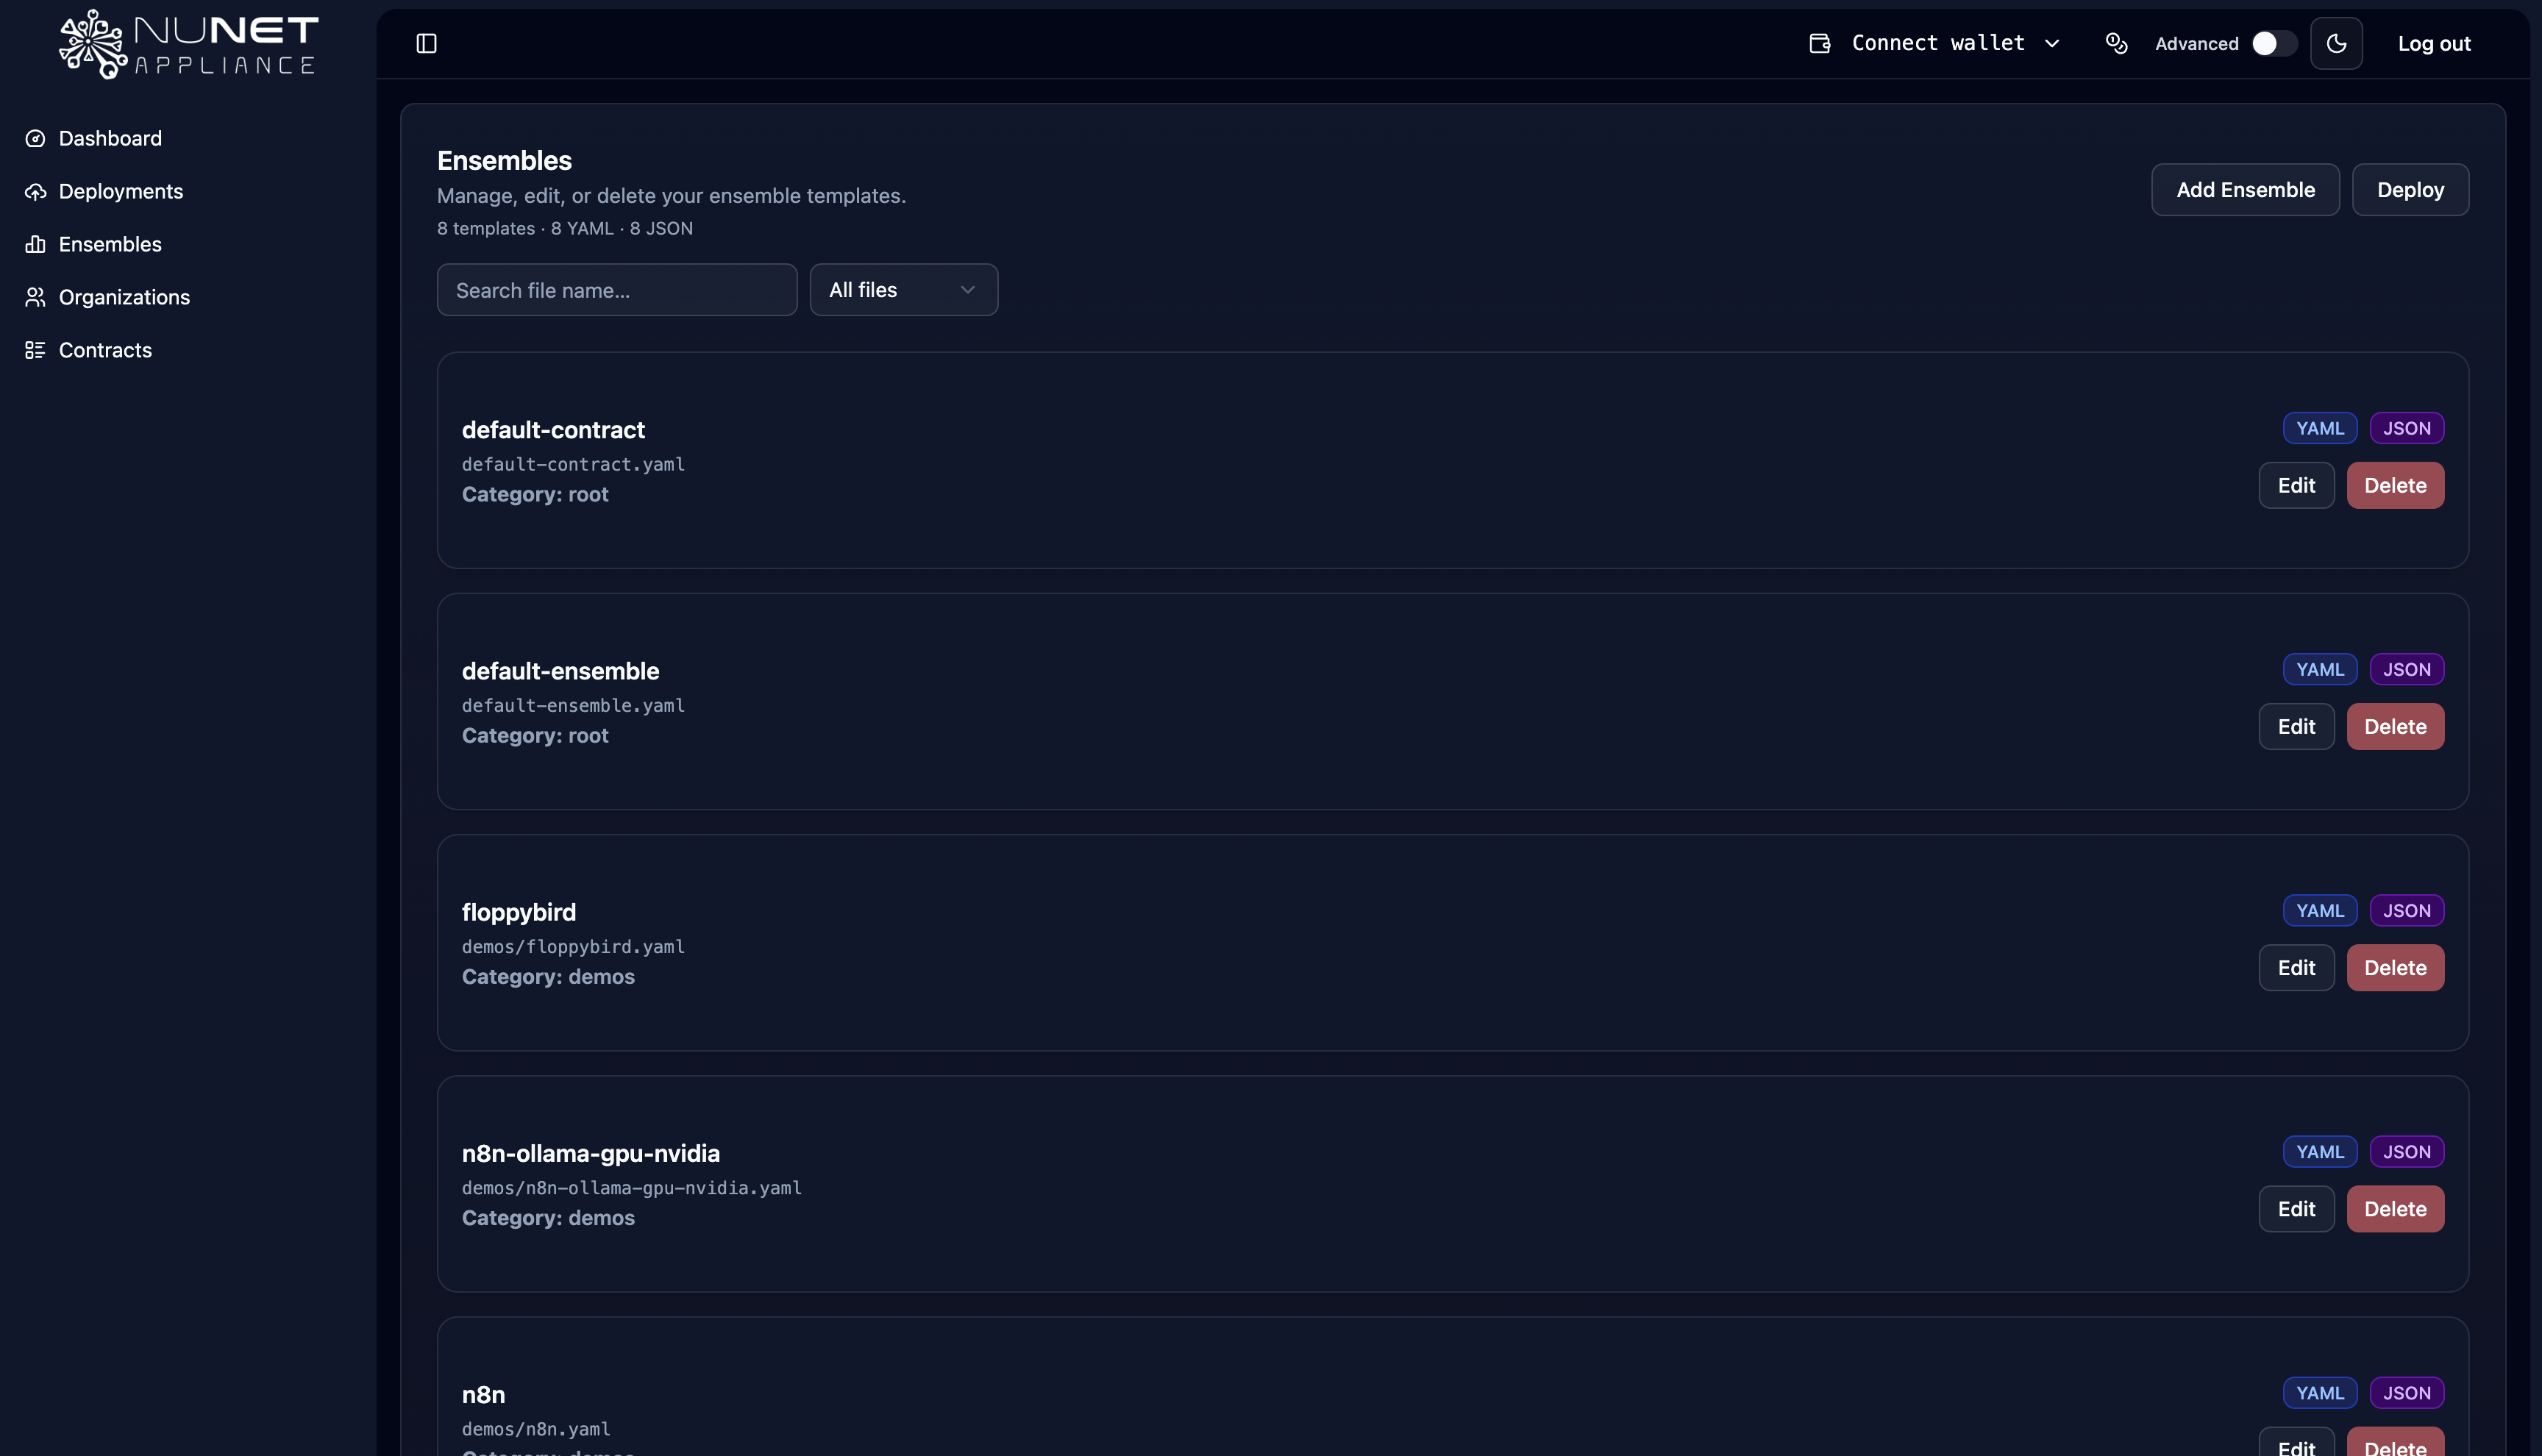
Uploading Ensemble Files
To upload an ensemble:
-
Navigate to Ensembles
- In the NuNet Appliance dashboard, go to Ensembles
- Click Add Ensemble
-
Select Your YAML File
- Click to select your YAML file from your local system
- The file browser will open for you to choose your ensemble YAML file
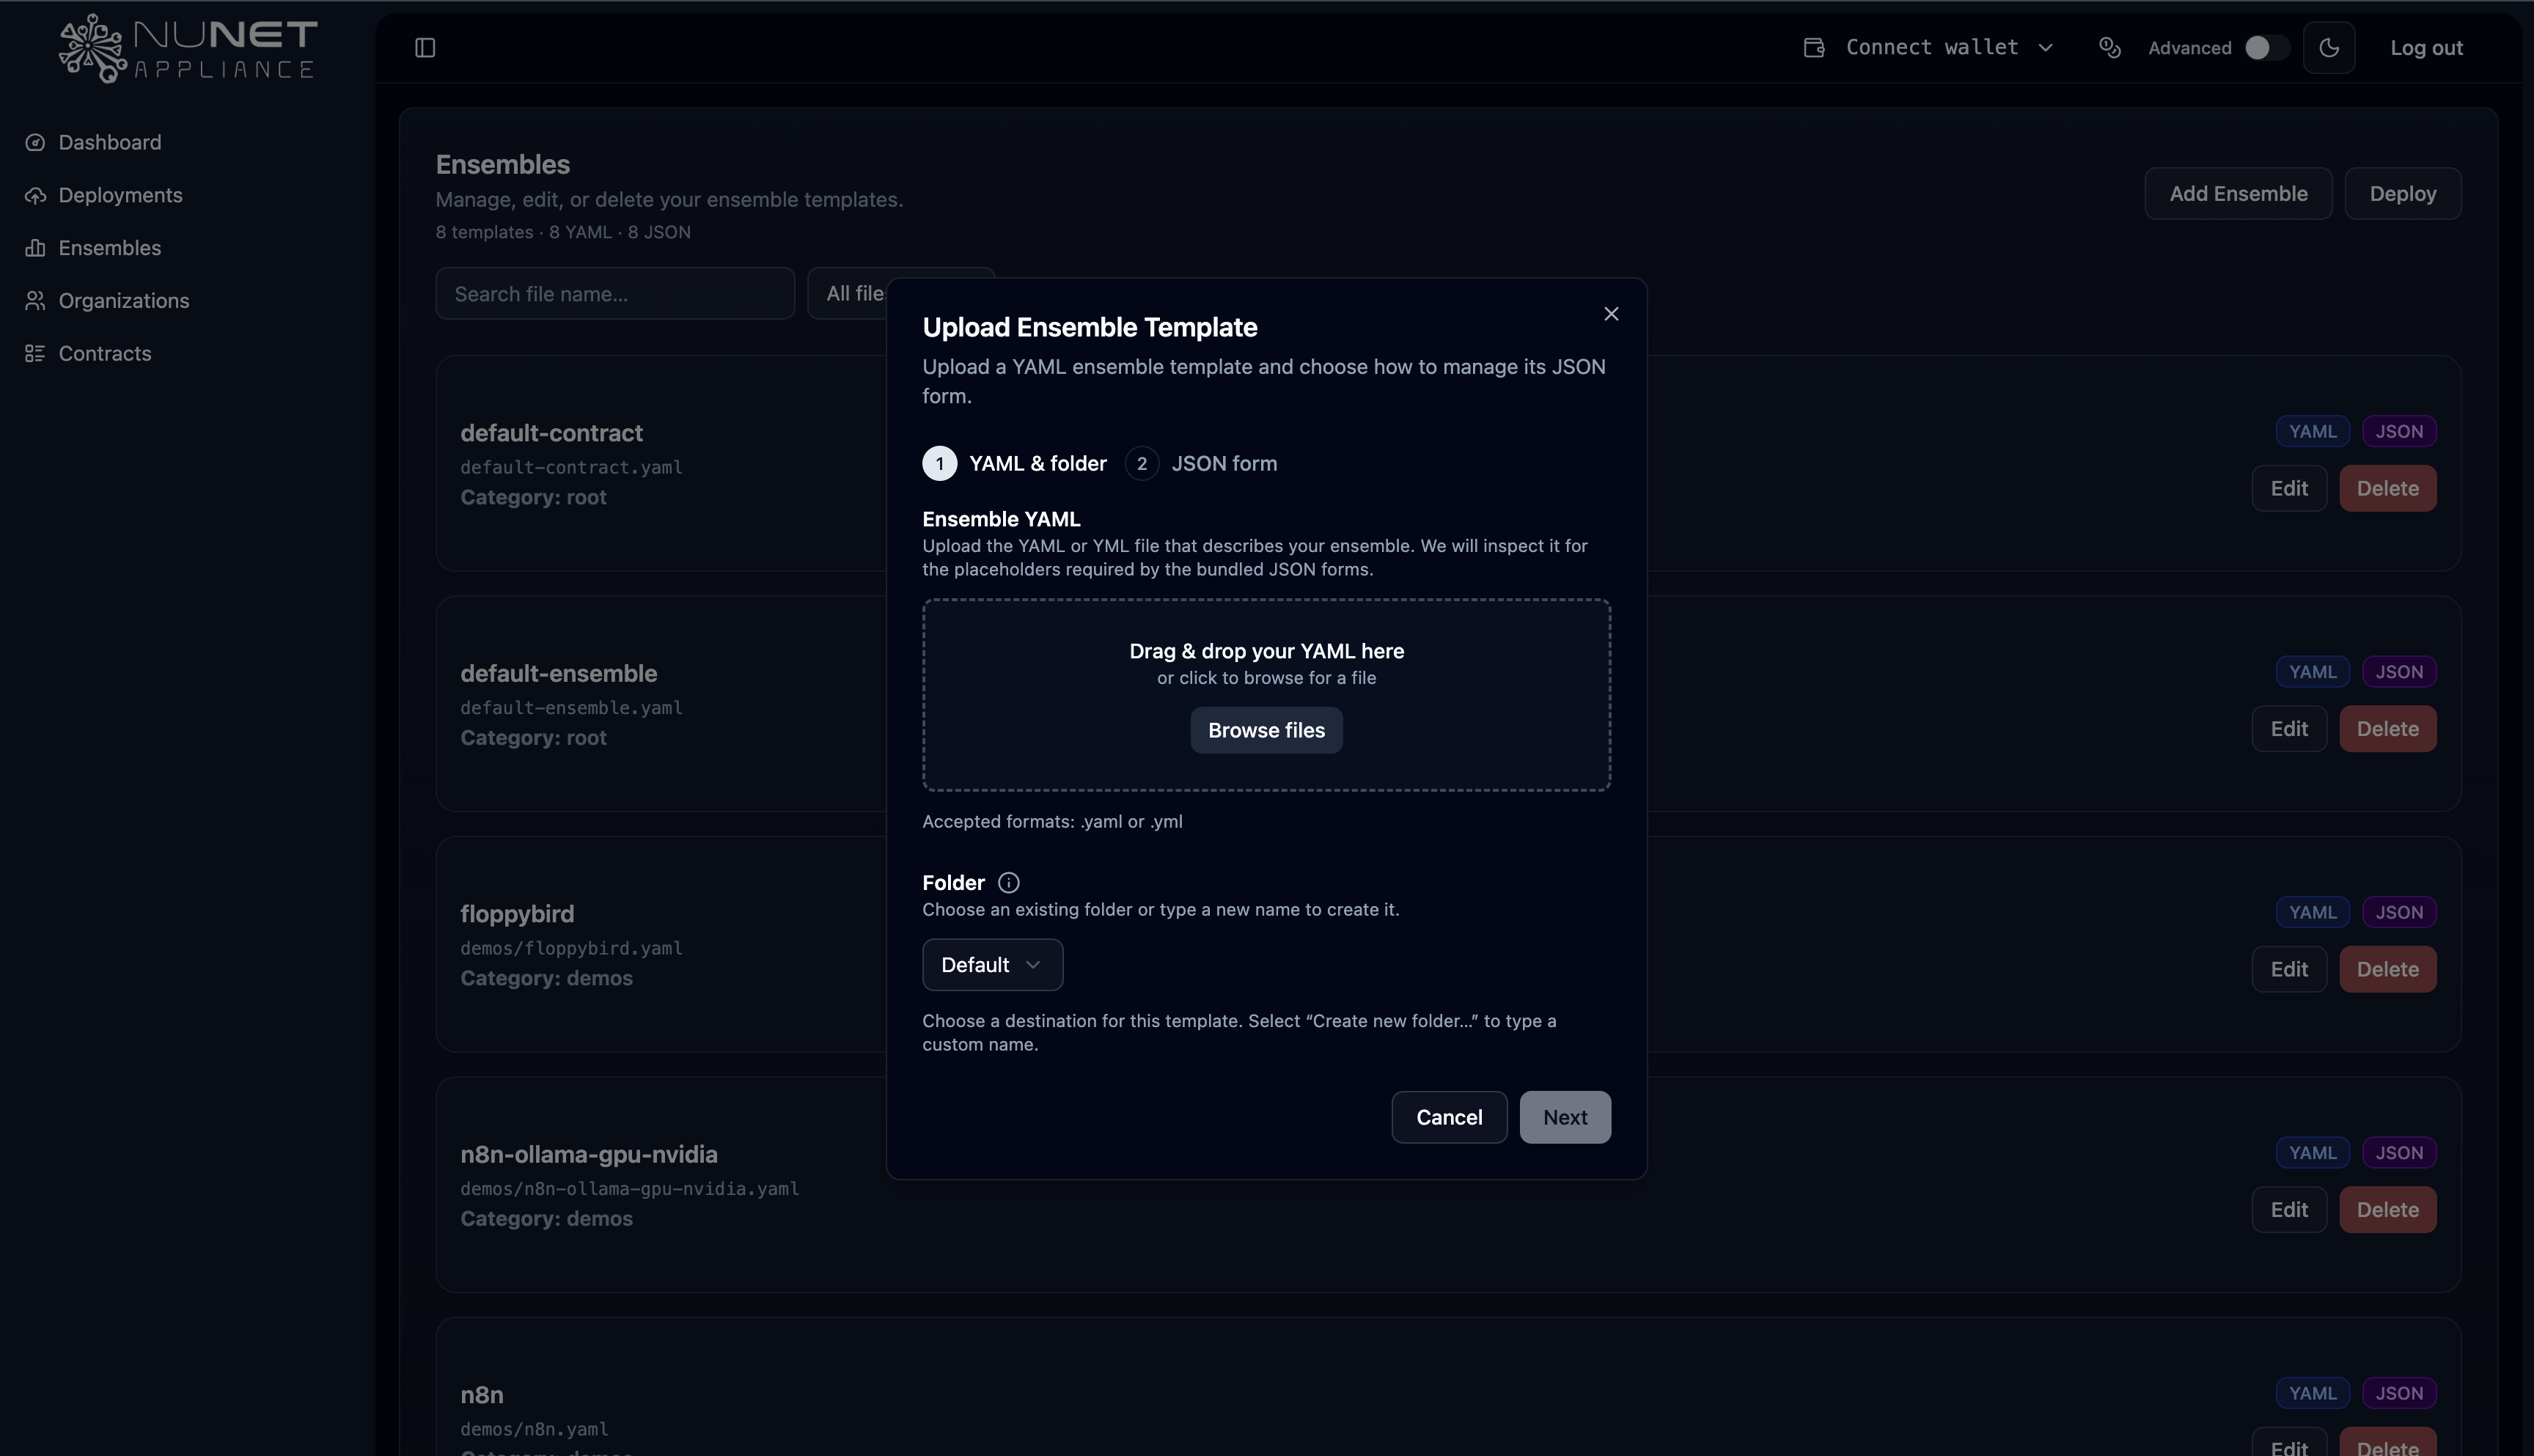
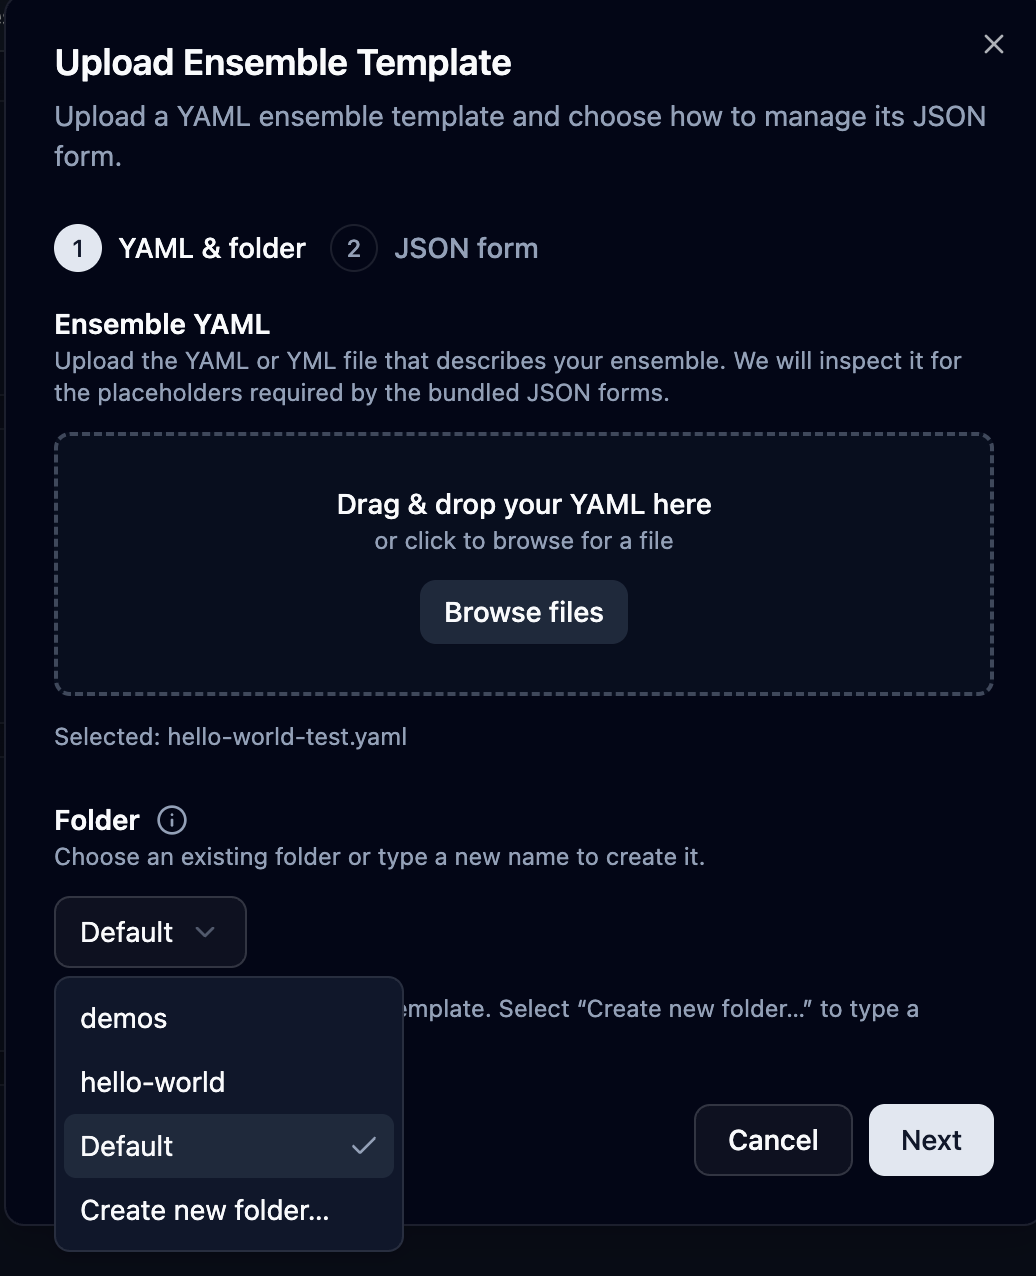
-
Choose or Create a Folder
- Select an existing folder from the dropdown, or
- Click New Folder to create a new folder for organizing your ensembles
- Enter a folder name (e.g., "Testing", "My Ensembles")
-
Configure JSON Options After selecting your YAML file, you'll have three options for handling JSON:
- Bundle JSON: Use the bundled JSON option (automatically generated)
- Attach Your Own: Upload your own JSON file that corresponds to the YAML
- Paste JSON: Paste JSON content directly into the interface
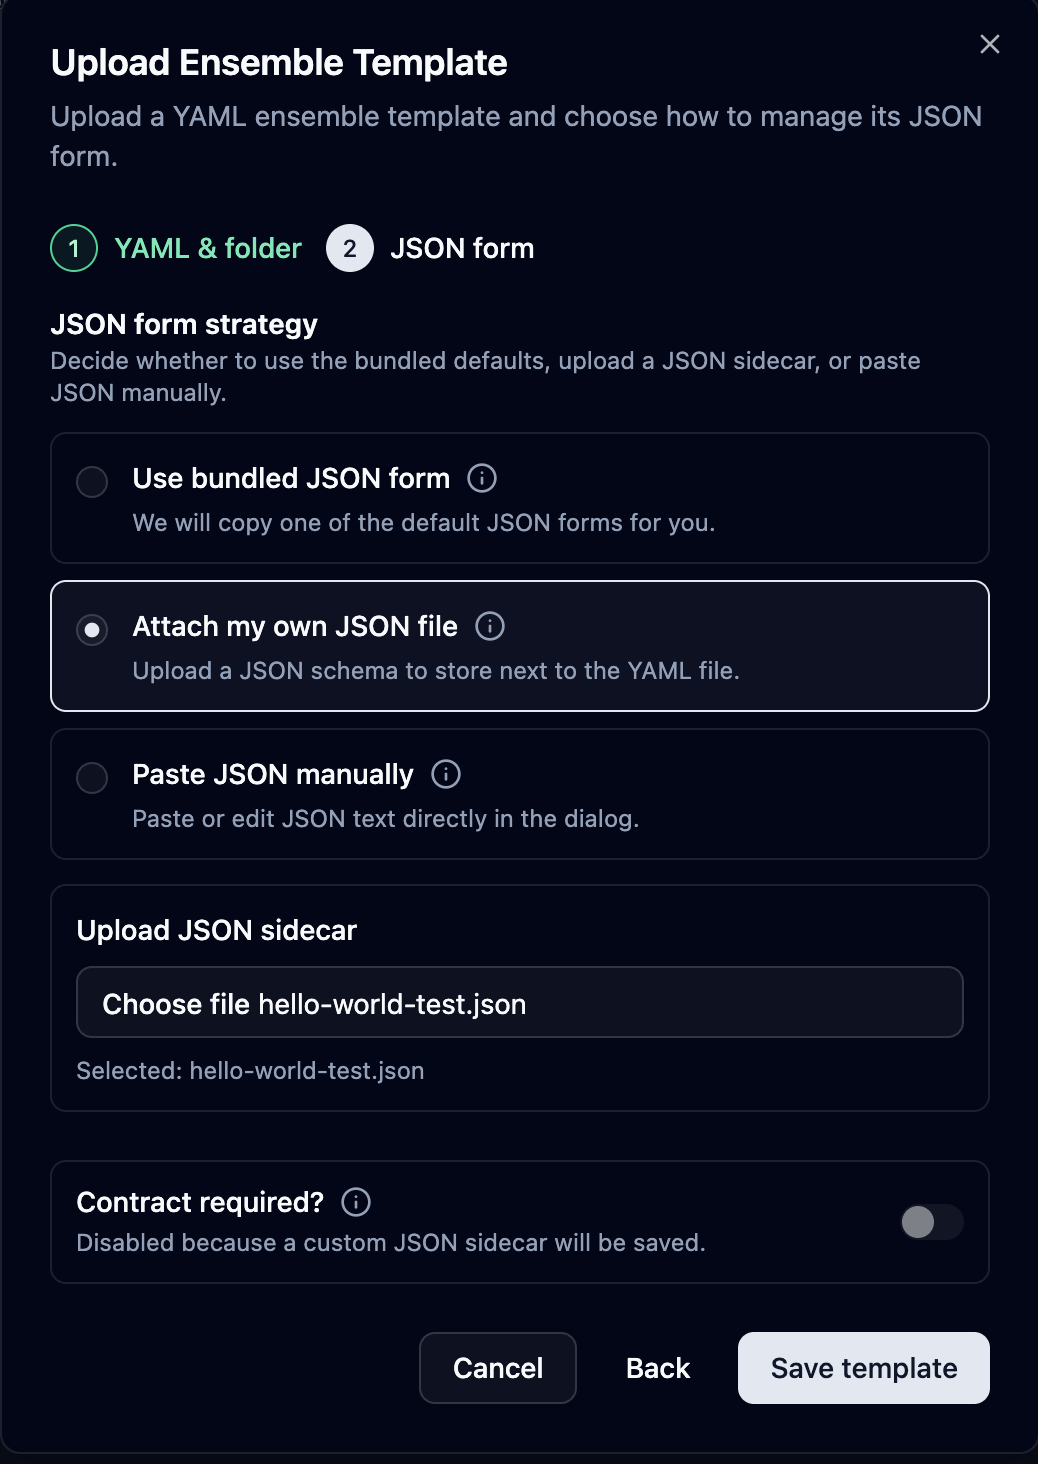
-
Save the Template
- Review your configuration
- Click Save Template to save your ensemble
- Your ensemble will now be available in the ensembles list for deployment

Organizing Your Ensembles
Folders help you organize your ensembles:
- Create New Folders: Use descriptive names to group related ensembles
- Select Existing Folders: Keep ensembles organized by project, purpose, or environment
- Search and Filter: Once saved, you can search for your ensembles by name in the ensembles list
Deploying Your Uploaded Ensemble
After saving your ensemble template:
- Go to Deployments in the dashboard
- Click Add Ensemble
- Select your uploaded ensemble from the list
- Follow the deployment process as described in the Deployment Guide
Your custom ensemble will be available alongside pre-made templates, giving you full control over your deployments.
Editing Ensembles
After uploading an ensemble, you can edit it to modify configurations, update parameters, or adjust resource requirements.
Accessing the Edit Interface
-
Navigate to Ensembles
- In the NuNet Appliance dashboard, go to Ensembles
- Find the ensemble you want to edit in the list
-
Open the Ensemble
- Click on the ensemble name or use the edit option
- The ensemble editor will open showing the current configuration

Editing Methods
You can edit ensembles in two ways:
Method 1: Edit YAML and JSON Files
-
Download the Current Files
- Download the current YAML and JSON files from the ensemble editor
- Edit them in your preferred text editor (e.g., Visual Studio Code)
-
Make Your Changes
- Modify allocations, nodes, resources, or other configuration parameters
- Update resource requirements, container images, or execution settings
- Save your changes
-
Upload Updated Files
- Upload the modified YAML file
- Upload or paste the updated JSON file if applicable
- Save the changes
Method 2: Paste YAML and JSON
-
Access Paste Mode
- In the ensemble editor, use the paste option for YAML
- Similarly, paste your updated JSON content
-
Make Your Edits
- Paste your modified YAML content
- Paste your modified JSON content if needed
- Review the changes
-
Save the Updated Ensemble
- Click Save or Update Template to save your changes
- The ensemble will be updated with your modifications
What You Can Edit
When editing an ensemble, you can modify:
- Resource Requirements: CPU cores, RAM, disk space, GPU allocation
- Container Images: Update Docker images or container configurations
- Allocations: Add, remove, or modify allocations
- Nodes: Change node configurations or add/remove nodes
- Execution Settings: Modify execution types, environment variables, or runtime parameters
- DNS Names: Update DNS names for deployments
- Network Settings: Adjust network configurations or proxy settings
Important Considerations
Before editing an ensemble:
-
Active Deployments: Check if the ensemble has active deployments
- Editing an ensemble does not automatically update running deployments
- You may need to redeploy after making changes
-
Backup Original: Consider keeping a backup of the original ensemble
- Download the original files before making significant changes
- This allows you to revert if needed
-
Validate Changes: Ensure your edits are valid
- Check YAML syntax for errors
- Verify resource requirements are reasonable
- Confirm all required fields are present
-
Test Changes: Test edited ensembles before deploying to production
- Deploy to a local or test environment first
- Verify the changes work as expected
Saving and Using Edited Ensembles
After editing and saving:
- Updated Template: The ensemble template is updated with your changes
- New Deployments: New deployments will use the updated configuration
- Existing Deployments: Existing deployments continue using the original configuration
- Redeploy: To apply changes to existing deployments, you'll need to redeploy
Video Resources
For a visual walkthrough of creating and uploading ensembles, watch this tutorial:
This video demonstrates:
- Creating YAML and JSON files for ensembles
- Uploading ensemble files to the NuNet Appliance
- Organizing ensembles in folders
- Deploying custom ensembles to the network