NuNet Appliance Dashboard Walkthrough
The NuNet Appliance dashboard is your central control panel for managing your appliance, monitoring its status, and interacting with the NuNet network. This guide walks you through all the information and features available on the dashboard landing page.
Simple vs Advanced Mode
The dashboard can operate in two modes:
- Simple Mode: Streamlined interface for all your fundamental requirements like joining organisations on the Nunet network, managing ensemble files for deployment, contract creation etc
- Advanced Mode: Additional controls such us networking setup using UPnP
You can switch between modes using the toggle in the top navigation bar.
Overview
After logging in to your NuNet Appliance, you'll see the dashboard landing page. This page provides a comprehensive overview of your appliance's status, network connectivity, and active operations.
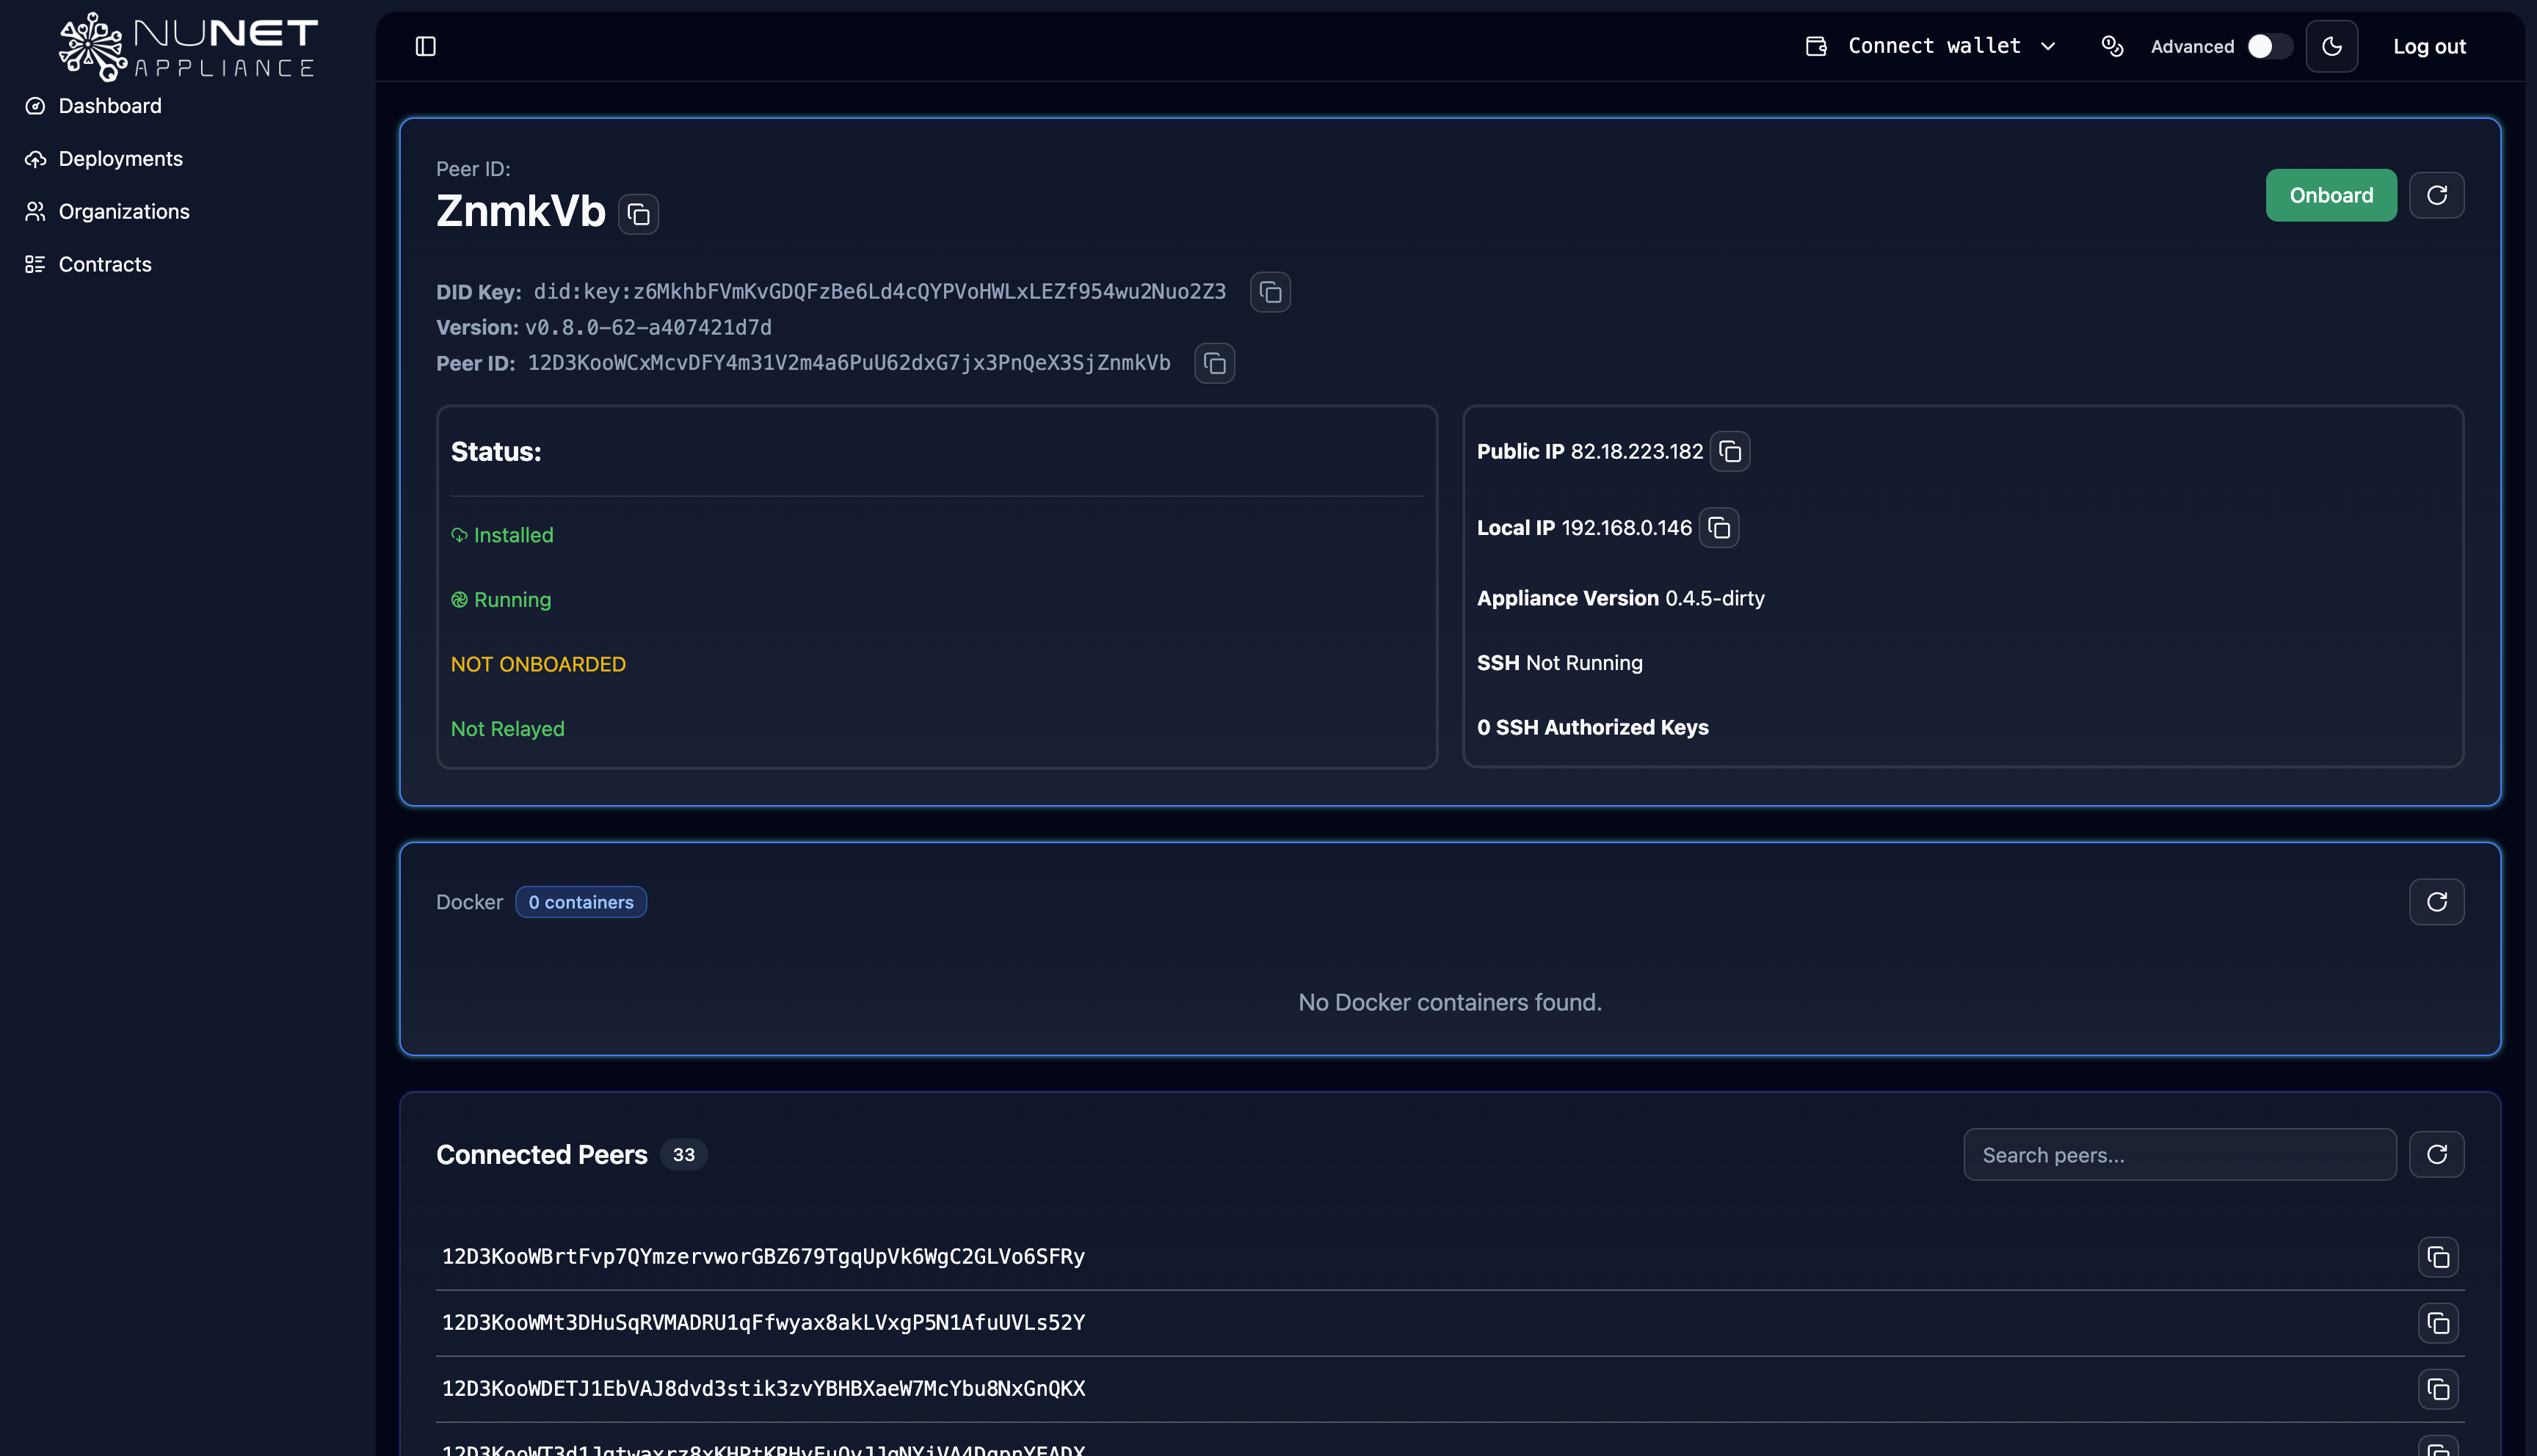
Identity Information
The dashboard displays your appliance's unique identity information:
Peer ID
Your Peer ID is a unique identifier for your appliance on the NuNet network. This ID is generated when the appliance is first initialized and remains constant for your appliance instance. It identifies your appliance in the NuNet peer-to-peer network and is typically displayed as a long alphanumeric string. It is used for establishing direct connections with other peers in the network.
DID Key
Your DID (Decentralized Identifier) Key is the cryptographic identity associated with your appliance. The NuNet appliance runs on top of the NuNet Device Management Service(DMS), and this key is associated with your DMS. This key is used for:
- Authentication: Verifying your appliance's identity
- Authorization: Granting and receiving capabilities in the network
- Secure Communication: Signing and encrypting messages
The DID key is part of NuNet's decentralized identity system and enables secure interactions within the network.
System Information
Appliance Version
The Appliance Version displays the current version of the NuNet Appliance software running on your system. This helps you:
- Track which features are available
- Ensure compatibility with network requirements
- Plan for updates when new versions are released
ℹ️ You can update the Appliance to the latest version using the button next to the version information
DMS Version
The DMS (Device Management Service) Version shows the version of the Device Management Service component. DMS handles:
- Device registration and identity management
- Resource monitoring and reporting
- Workload execution and management
- Network communication
ℹ️ You can update the DMS to the latest version using green up arrow next to the version information
⚠️ Important: Updating the DMS will restart the services. Ensure no allocations are running on your device.
Keeping DMS up to date ensures you have the latest features and security improvements.
Network Information
Local IP Address
Your Local IP Address is the IP address assigned to your appliance on your local network. This is typically in the private IP range (e.g., 192.168.x.x or 10.x.x.x). It is used for accessing the appliance dashboard from devices on your local network. You can use this IP to connect to the appliance via web browser.
- Note: This IP may change if your network configuration changes
Public IP Address
Your Public IP Address is the external IP address visible to the internet. This is important for allowing connections from outside your local network, enabling other peers to connect to your appliance and for hosting services that need external access
Note: If your appliance is behind a router with NAT, you may need to configure port forwarding for external access. Some networks may not provide a public IP address (e.g., mobile networks with carrier-grade NAT).
Appliance Status
Status Indicator
The dashboard displays the current Status of your appliance. It may show that the appliance is running and connected to the network, not connected or DMS is not running or that there is an issue that needs attention.
The status indicator helps you assess whether your appliance is functioning correctly.
Onboarding Status
The dashboard clearly indicates whether the resources of your device are Onboarded or Not Onboarded:
- Onboarded: Resources of your device have been made available to be utilised by authorised peers in the network
- Not Onboarded: Your device can only be used to create and manage deployments to other peers in the network.
ℹ️ You can manage your device status using the Onboard/Offboard button located in the top-right corner of the dashboard.
Resource Status
If you have onboarded your resources, you can see a real-time breakdown of how your device's resources are being utilized by the NuNet network
Understanding the Resource Categories
The dashboard categorizes your hardware (Cores, RAM, and Disk) into three distinct states:
🟢 Free Resources: These represent the capacity currently idle and available to accept new compute tasks.
🔴 Allocated Resources: This shows the resources currently being reserved for active workloads or running allocations.
🔵 Onboarded Resources: This is the total amount of hardware you have committed to the NuNet network. It represents the sum of your Free and Allocated resources.
Running Containers
The Running Containers section displays all active containers currently running on your appliance. This section shows:
Container Information
For each running container, you can see the name or identifier of the container and the container image being used.
Connected Peers
The Connected Peers section shows all peers that are currently connected to your appliance or that your appliance is connected to in the NuNet network.
Dashboard Navigation
The dashboard typically includes navigation options for:
- Dashboard: Return to the main landing page
- Deployments: View and manage deployments
- Organizations: Manage organization memberships
- Contracts: Create, view and manage contracts
- Ensembles: Manage compute ensembles
- Appliance (Advanced Mode): Configure network settings via UPnP
Next Steps
Now that you understand the dashboard:
- Proceed to Joining an Organization
- Learn about Deploying Applications
- Explore Ensemble Management
- Review Post-Deployment Operations