main
Last updated: 2025-10-09 01:08:10.975350 File source: link on GitLab
NuNet Appliance Documentation
Table of Contents
What Is NuNet?
NuNet decentralizes computing into a peer-to-peer network of devices, creating a self-balancing "world computer" where anyone can contribute resources, monetize data, or access affordable computation. NuNet utilizes a Device Management System (DMS) to connect, manage, and utilize these resources.
What Is the NuNet Appliance?
The NuNet Appliance simplifies device onboarding and DMS management. It operates within a virtual machine (VM) to ensure isolation, consistency, and easy management.
The appliance provides a uniform environment to run DMS, which includes:
Actor System: Runs automated tasks and services. \
Peer Networking: Connects with other nodes in the network. \
Ensemble Management: Coordinates complex computing tasks. \
Installation Overview
Prerequisites
Stable internet connection \
VirtualBox installed \
Appliance image (provided by NuNet) \
Minimum: 4GB+ RAM, 20GB+ disk space \
Installation Instructions
Download and install VirtualBox: VirtualBox Downloads
Download the NuNet Appliance image: \
AMD64: Download here
ARM64: Download here
Open VirtualBox and double-click the appliance file to load it. \
Adjust resource allocation as needed (Minimum: 2 CPUs, 4GB RAM, 20GB Disk Space). \
DMS starts automatically after installation. \
⚠️ **Security Warning:** Only download from NuNet official links and always verify file hashes against the ones provided by NuNet.
The NuNet Appliance Menu
On the NuNet Appliace Menu, you can find a status area that shows important information about the appliance running on your machine.
The status section has the following displayed system information:
Local IP Address: This is the local IP address of your machine, e.g., 192.x.x.x
Internet IP Address: Your internet IP address, e.g., 82.x.x.x
Appliance Version: The version of the NuNet appliance running on your machine, e.g., v1.4.0
Branch: The branch from which the appliance menu has been served from, e.g., main
Menu Version: The appliance menu version. Note that this is different from the Appliance version. This is deprecated and will be replaced by the Appliance Version. e.g., 0.33
Automatic Security Updates: Confirms if security updates are enabled or not, with last update timestamp
Docker Status: Tells the status of docker on the appliance running on your machine e.g., Running
SSH Status: If you have enabled SSH on the appliance, you will find the status and the number of authorised keys here.
DMS Status: Installed with version
Running Context: The context of the currently e.g., dms
DMS DID: DMS Decentralized Identifier assigned to your appliance
DMS Peer ID: Unique identifier of your peer on the NuNet network
NuNet Network Connection Type: e.g., Direct connection
Note: You can interact with the appliance using the numbers on the menu item. For example, when you first land on the menu, you can select Manage NuNet DMS by inputing 1 when prompted.
Basic Operations
Manage NuNet DMS

The Manage NuNet DMS menu item, allows for basic DMS operations, including Starting/Restarting/Stopping the DMS, Enabling/Disabling the DMS, Initializing the DMS, Onboarding/Offboarding compute, e.t.c.
Note: The difference between Starting/Restarting the DMS and Enabling/Disabling the DMS, lies in the permanence of the operation. Start/Restart DMS temporarily pauses the DMS service without affecting its boot-time behaviour. Conversely, Enabling/Disabling the service permanently decomissions the DMS and affects the boot time behavior of the DMS.
Onboard Compute
When the appliance is running and you can see the menu, you can onboard resources by selecting the Manage NuNet DMS item on the menu. You will see a sub-menu that includes a number of things you can do with the DMS. Select the Onboard Compute option to onboard maximum resources. You can adjust the amount of resources you'd like to allocate to the appliance by going to virtual box, selecting the appliance and adjusting CPUs in the System section or RAM and Disk Storage in Storage section. Note that these adjustments can only be done when the appliance is not running.
Note: You need to onboard again if you do increase the resources you allocate to the NuNet appliance.
Offboard Compute
To offboard compute, select the Manage NuNet DMS option on the menu. You will find a sub-menu that includes a number of things you can do with the DMS. Select the option to offboard compute.
View Connected Peers
The View Connected Peers option allows you to view other peers on the network by peer ID. Select the menu item Manage NuNet DMS and then the option to View Connected Peers.
View Self Peer Information
You can view information about your machine as a peer on the network with the View Self Peer Information. Select Manage NuNet DMS then the option to View Self Peer Info. This option allows you view your DID, Peer ID, DMS context and Network Addresses.
Update DMS to Latest Version
To update the DMS version running on your machine use the Update DMS to Latest Version option. First select the option to Manage NuNet DMS then find the menu item Update DMS to Latest Version, to update your DMS version.
View Full DMS Status
Visualise the full status of the DMS running in your appliance with the View Full DMS Status option. Here, you will find the DMS Onboarding status, free and allocated resources, onboarded resources, running context, DMS DID and DMS peer ID of the DMS running in your machine. Select option the Manage NuNet DMS then View Full DMS Status to view your DMS status.
Manage Ensembles

View Running Ensembles
You can view running ensembles(deployments) on your machine by selecting option to Manage Ensembles and then the sub-option View Running Ensembles.
Deploy an Ensemble
With the right capabilities, you can run an ensemble with the Deploy an Ensemble option. Capabilities are granted by an organisation's 'worker'. In the future, you will be able to have the option to run an ensemble locally on your node.
Manage Ensemble Templates
The Manage Ensemble Templates option allows you to perform basic operations on an Ensemble file, such as open, copy and delete. If you do have an ensemble file on the appliance, you will be able to open/copy/delete the file from here.
Main Menu → Manage Ensembles → Manage Ensemble TemplatesDownload Example Ensemble Templates
This menu option allows you download an example ensemble template from the NuNet repository. Downloaded templates are stored in your local ensembles directory.
Main Menu → Manage Ensembles → Download Example TemplatesEnhanced Ensemble Management
The Enhanced Esemble Management option provides for a fine grained management of ensembles. It allows you to perform more advanced operations on an Ensembles, such as ensemble deployment along with viewing the ensemble's manifest, logs and status. You will also find various pre-packaged ensemble files for various use-cases. 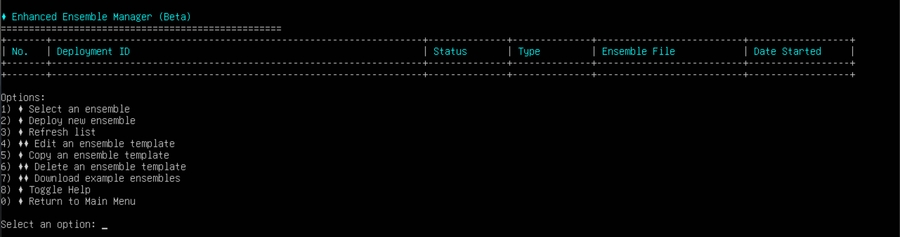
Main Menu → Enhanced Ensemble ManagerSelect an ensemble
With a list of ensembles(deployments) and their statuses displayed on the Enhanced Ensemble Manager dashboard, the Select an ensemble options allows you select one by their number, if any, and interact with it.
Main Menu → Enhanced Ensemble Management → Select an ensembleDeploy an Ensemble File
With the right capabilities, you can deploy a new ensemble. With this option, you can download an example ensemble if you do not have any on your running appliance.
NB: Capabilities are granted by an organisation admin/'worker'.
Main Menu → Enhanced Ensemble Management → Deploy an EnsembleRefresh List
The list of deployments on the Enhanced Esemble Management table does not refresh automatically. They can be refreshed by selecting Refresh List.
Main Menu → Enhanced Ensemble Management → Refresh ListToggle Help
Toggle Help flips the switch on help information on the Enhanced Ensemble Management page. You can toggle a display of text that gives more information on the page by selecting this option.
Main Menu → Enhanced Ensemble Management → Toggle HelpView Peer Details
The View Peer Details option allows you to view a list of peers on the network by peer ID.
Main Menu → View Peer DetailsRun Depin Nodes Locally
The Run Depin Nodes Locally option, allows you to run decentralised physical infrastructure(DePin) nodes. At the moment, this feature is in Beta. Contact the NuNet team on Discord to create DePin Nodes.
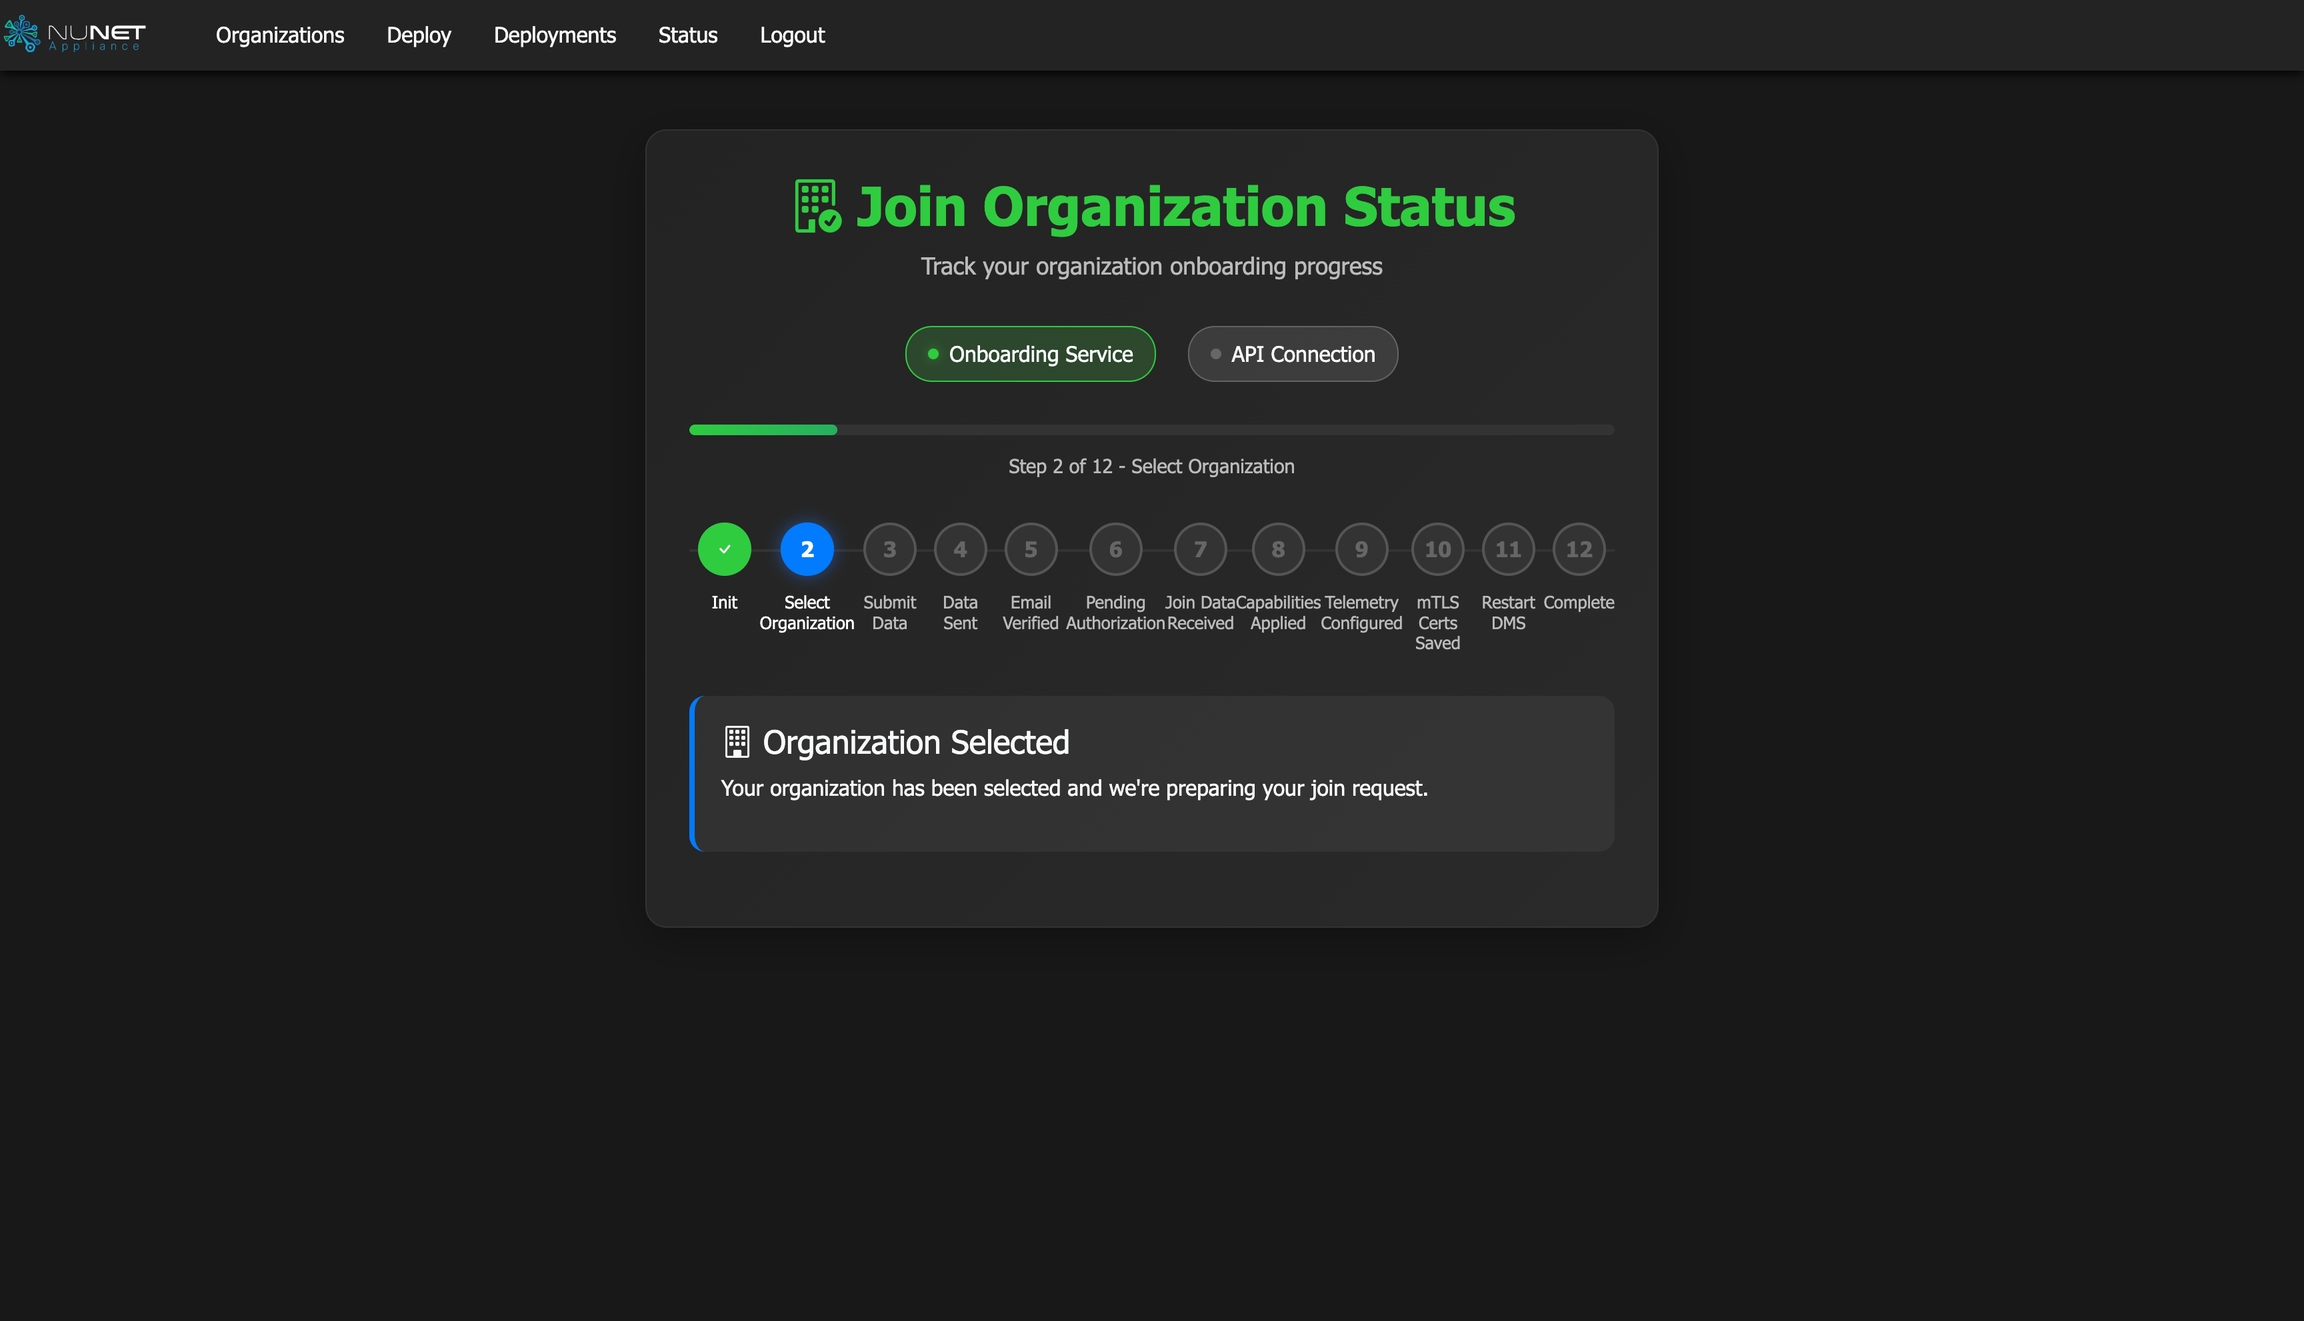
Connecting To an Organisation
You can connect to an organisation by selecting option 5 on the main menu. Selecting this option gives you a list of organisations you can join. Read all the instructions and proceed following the direction of the prompts. In the future, you will be able to create a custom organisation and allow other peers to join the organisation. At the moment, you can join the NuNet Compute Testnet Organisation.
Main Menu → Connect to Organizations → NuNet Compute TestnetViewing Logfiles
The View Logfiles option provides an interactive menu for users to access different log files related to the DMS. The menu presents two primary options: viewing the DMS log and viewing the deployments history log. Each option retrieves and displays the relevant log data.
Manage NuNet Appliance
The Manage NuNet Appliance menu allows for managing various aspects of the NuNet appliance. The available options include changing the active branch, checking for updates, managing plugins, handling backups, enabling SSH access, and controlling automatic security updates.
Change Active Branch
With the Change Active Appliance option, you can change the branch from which the appliance is served. By default, the active branch is the main branch. You can change the branch by entering the branch you want to serve the appliance from.
Installing Appliance Updates
Use this to option to see if a newer version of the NuNet appliance is available. It compares your current version with the latest version available on GitLab. When complete, you'll need to restart the menu to use the new version.
Re-Download Menu
You can completely re-download a fresh copy of the menu from GitLab. It asks which branch you want to download from (defaulting to the main branch) and gives you a warning before proceeding since this will overwrite your current menu files. After completion, you must restart the menu to use the fresh version.
Manage Plugins
The Manage Plugins menu option handles all plugin-related operations. This option is in Beta.
Backup Appliance
The Backup Appliance option creates a compressed backup file of your important appliance configuration including your settings, version, branch, and plugins. The backup is saved with a timestamp in its name so you can identify when it was created. You can use this regularly or before making major changes to your appliance.
Restore from Backup
The Restore from Backup option lets you restore your appliance configuration from a backup file you created earlier. You need to provide the exact backup filename. After restoration, you'll need to restart the menu for changes to take effect. Use this if you need to revert to a previous working configuration.
Enabling SSH Access
The Enable SSH Access runs a special script that helps set up SSH access to your appliance. This is useful if you need command line access to your appliance. The script will guide you through necessary configuration steps.
Step 1: System Compatibility Check
To connect to your appliance via SSH, first, the system checks if you're running on a Debian-based system (like Ubuntu). This is important because the SSH setup process can vary between different Linux distributions. If you're not on a compatible system, it'll tell you and exit.
Step 2: Preparing the SSH Environment
Before doing anything with your keys, the system makes sure your SSH directory exists and has the right permissions. The permissions are important because SSH is very particular about security.
Step 3: Network Detection and Warning
The system then checks your network situation by looking at your IP addresses. If it finds public IP addresses (meaning your appliance might be internet-accessible), it gives you a warning. At this point, you'll find the link with which you can access a web page to connect via SSH. 
Step 4: Web Interface Setup
The system displays a webpage. This page serves two main purposes: it lets you paste an existing SSH public key, or generate a brand new keypair right in your browser. 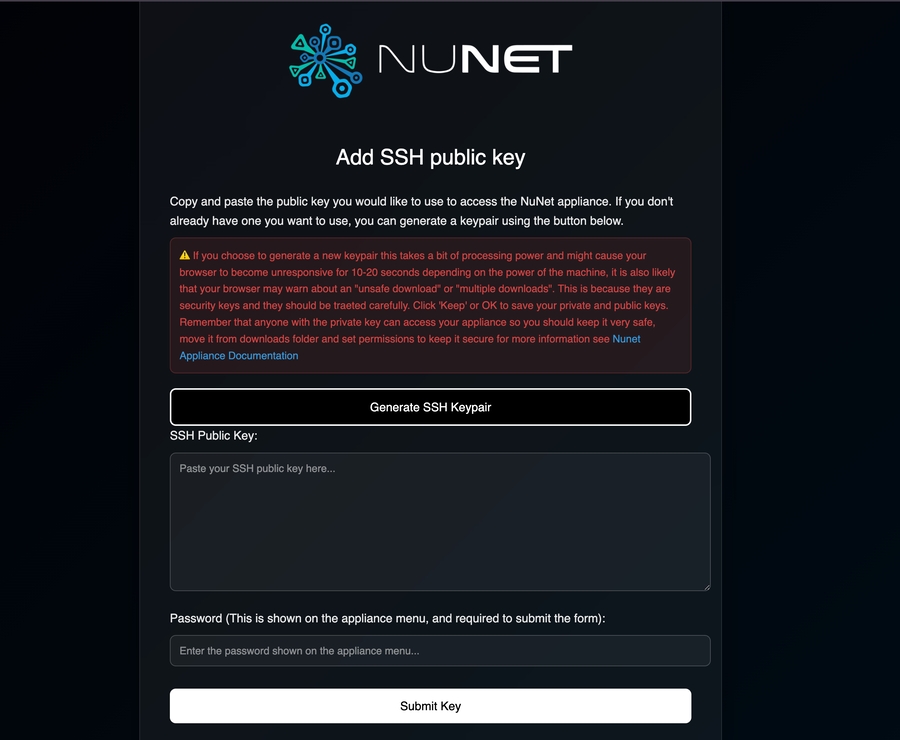
Step 5: Key Generation (Optional)
If you choose to generate a new keypair, the webpage can create a secure keypair directly in your browser. Click on Generate SSH Keypair. The keys automatically download to your computer, and the public key gets inserted into the form for you.
NB: The system warns you that this might take 10-20 seconds and could trigger browser security warnings about the downloads.
Step 6: Password Protection
To prevent random people from adding keys, the system generates a random password (like "blue-wolf") that's shown in your terminal. You'll need to enter this on the webpage to submit your key.
Step 7: Key Validation
When you submit a key, the system carefully checks that it's properly formatted. It looks for standard SSH key prefixes and valid base64 encoding. This validation prevents you from accidentally entering garbage that would lock you out of your system later.
Step 8: Final Confirmation
After receiving your key through the web interface, the system shows you the key in the terminal and asks for one last confirmation before writing it to your authorized_keys file. This is your final chance to double-check everything looks right. If you confirm, it carefully appends the key to the file with proper permissions.
The whole process is designed to balance security with user-friendliness, so you can go through what can normally be a technical process while maintaining strong security practices throughout. The web interface makes it accessible even if you're not comfortable with command line SSH tools, while the various checks and confirmations ensure you don't accidentally lock yourself out of your own system.
Web Onboarding
You can now scan a QR code or visit a displayed web address on your appliance to get onboarded. On the main menu, select the Show Web Server Login Details to onboard your appliance. You will also be able to Join an Organisation and make deployments from your web or mobile interface with this option.
Scan Your Unique QR code
Or enter the Web Address And Password shown on your appliance 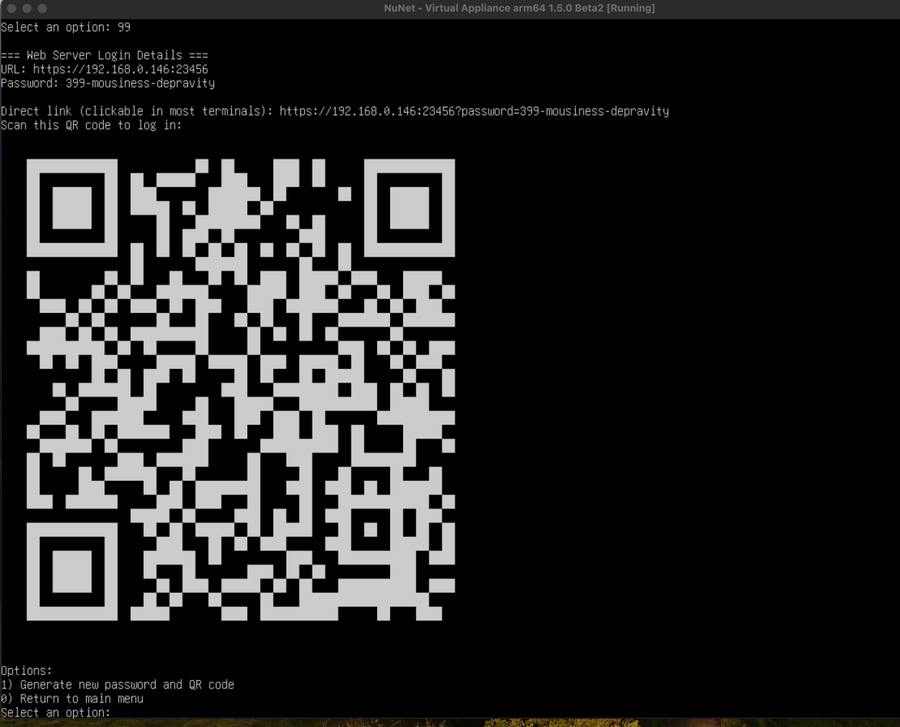
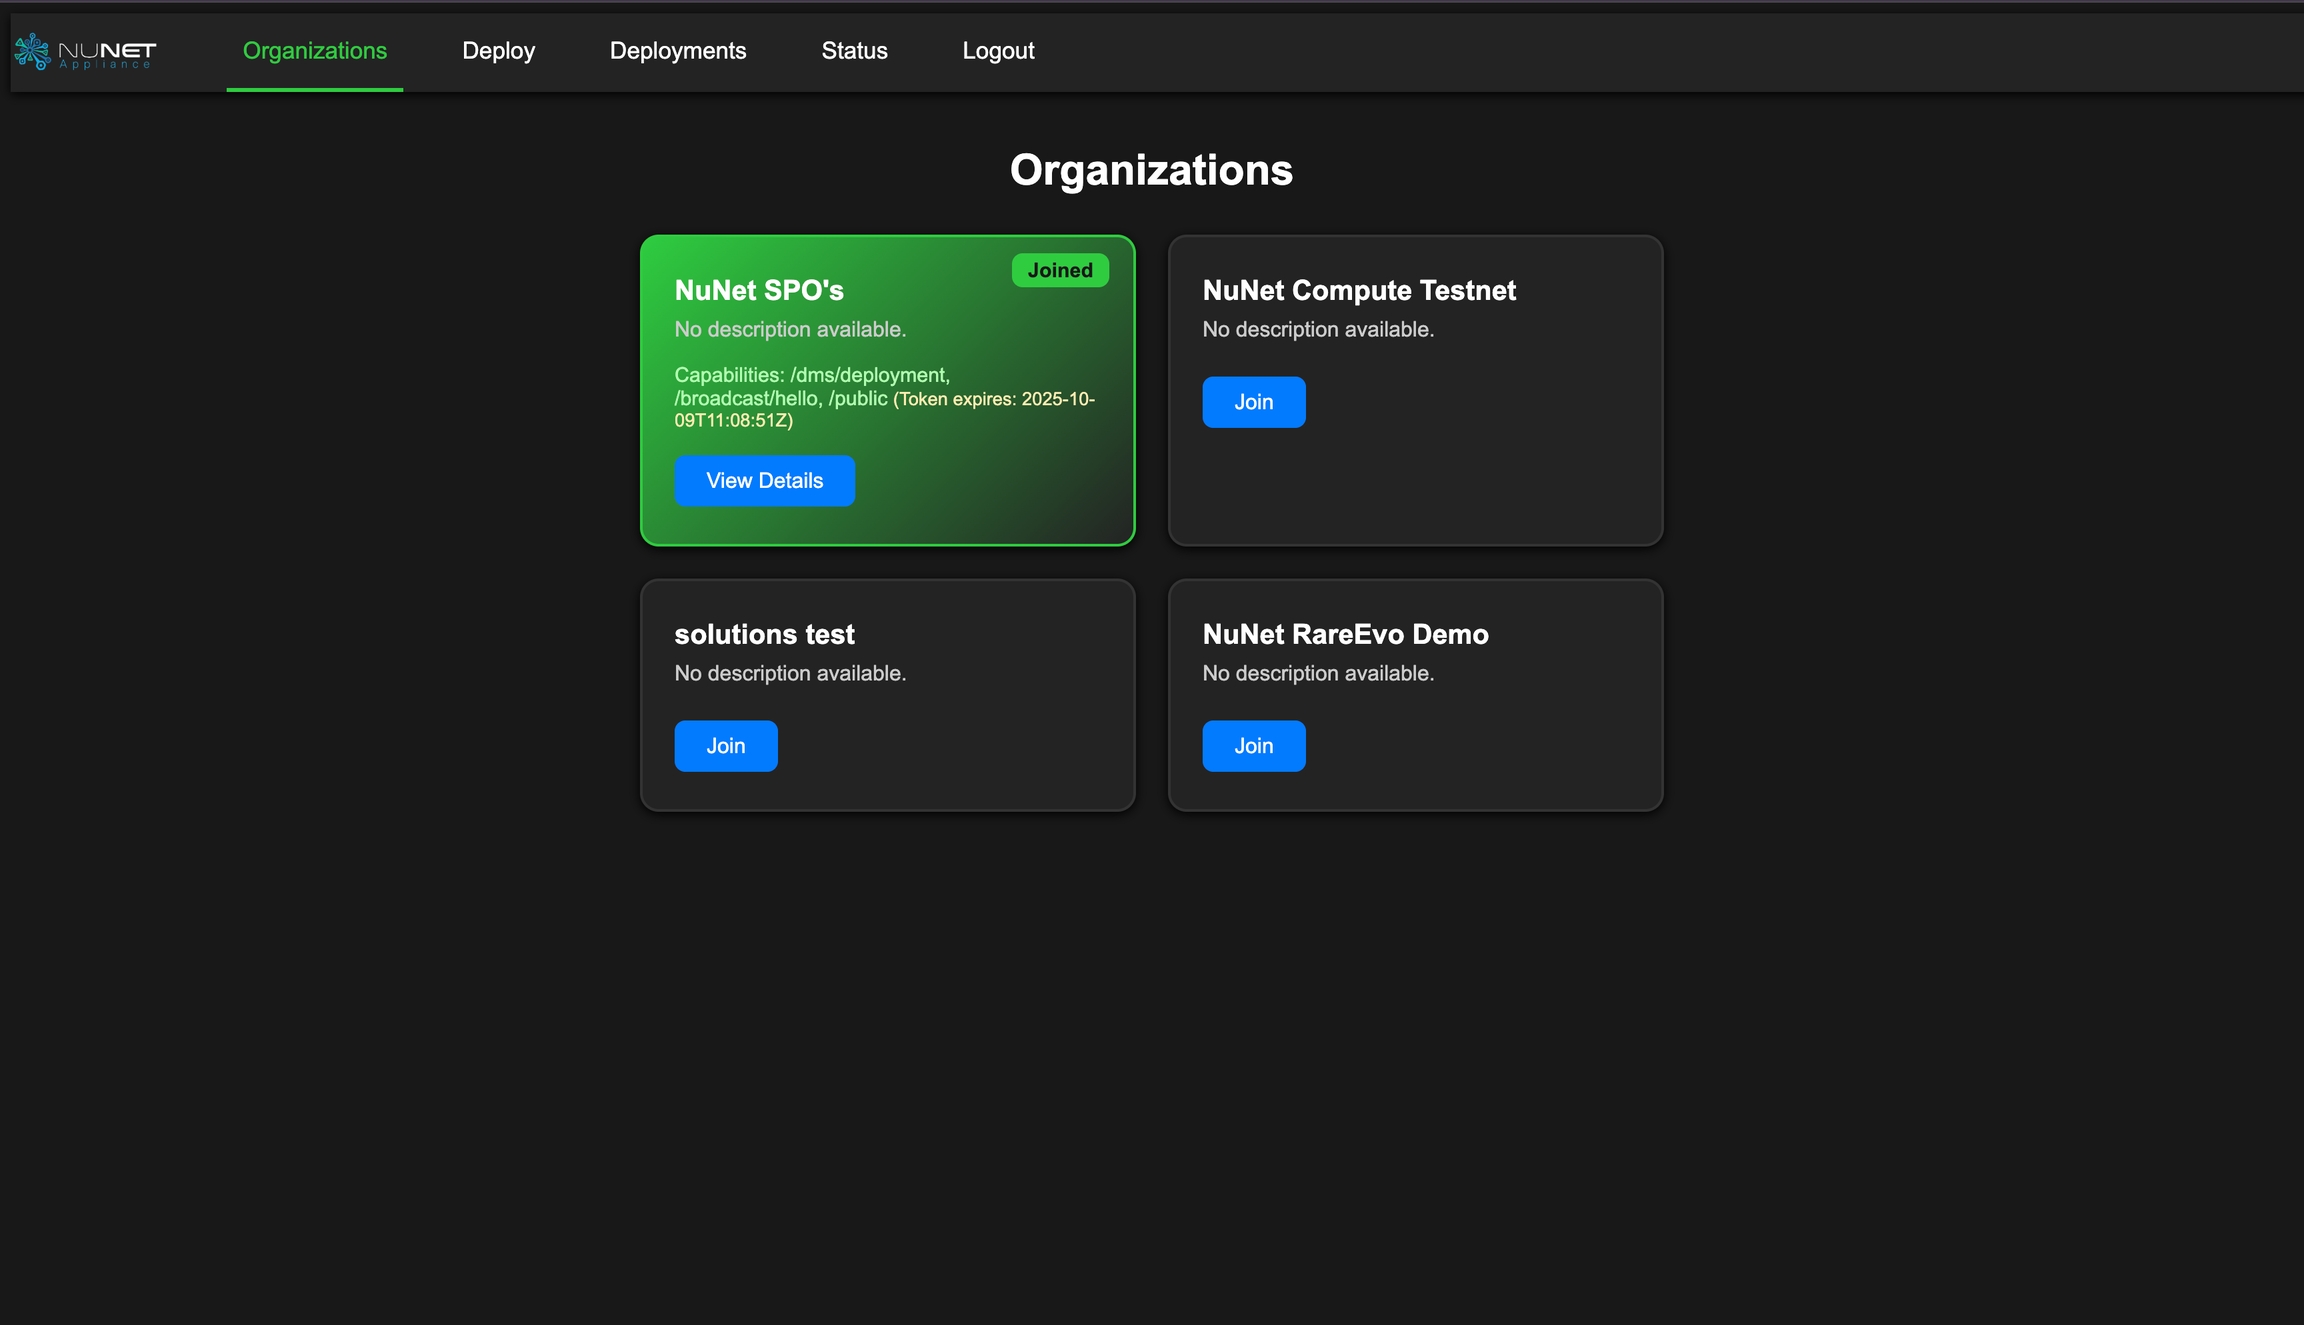
Navigating The Landing Page
The landing page shows a list of options including Onboarding Steps, Organisations you can join, sample ensembles you can deploy, and a status of your deployments.
Deploying Ensemble via The Web/Mobile Interface
Selecting the Deploy option on the navigation pane of the web interface allows you to find a list of deployments you can make on the fly. Select any, and follow the prompt to make a deployment. 
Troubleshooting
DMS Not Starting
Restart DMS (Main Menu → 1. Manage NuNet DMS → 1. Start/Restart DMS)
Connection Issues
Check VM network settings
Resource Errors
Verify allocations in VirtualBox
Need Help?
If you encounter any issues or need assistance, feel free to reach out:
Email: [email protected]
Community Forum: Join here
Happy testing, and thank you for being part of the NuNet Appliance Installer Testnet!
Last updated